Sunday, 27 January 2013

Title Design

Horror film titles
 
Iconography - Images and symbols
The photos, images, short clips or full scenes used during the introduction are usually used to draw the viewer in and create interest from the start. If the first few clips of the film are really dull and boring, it may spoil the film and the viewer could loose interest quite quickly and lower their expectations for the rest of the film.  In horror films, the type of images appearing during the introduction consist of  clip or a sequence of images relating to the type of horror involved. It is important that the images relate to the film itself as if there is not connection then there is not much point having those images in the first place. The type of things used are often used in the film its self. In the titles for horror films, these images are also very important.
 
The symbols used in horror films and horror posters are also always relevant to the plot of the story. Sometimes the most recognisable symbol is that of someone screaming or the face of the 'monster' its self. When people see this type of imagery they automatically link it to horror. It also helps to make the film more appealing and interesting. If the photos were dull or did not suggest the theme of horror well enough then interest is taken away.  
 
Colour
 
Colour is another important feature of the title design. Horror films include gloom and darkness and the type of colours used are greys and black. Theses colours are used with in the title as well as through out the rest of the film. It starts the theme right from the very start. In the title design for horror, bright colours are never used. This is because bright colours are not associated with the theme of horror.
 
Typography
 
The type of text design used in horror titles (and any other title for any film) are also very important. They must relate to the theme because if they don't it makes the title look bad and unplanned. If the theme is horror the person designing the text to be used for the title would not be bubbly text but something more plain, maybe with one of the letters looking like it have blood dripping from it. But at the same time the text cannot be boring, if the text was boring then the title may not look as interesting and attention may be lost.
Bellow is an example of a good text design that could be used for a horror film.
 
 
Bellow is a poster for a horror film Scream, this is a good example to show the imagery, text and colours used to represent horror films. The colours are dark and the images relates to the film. The text also stands out and is quite a dramatic font.  


This is another poster for a different film. Once again, dark colours and dramatic text is used. This poster also shows the face of the monster unlike the poster for Scream which shows the face of a frightened person.    
 
Both posters relate well to the theme of horror.  


Wednesday, 16 January 2013

Editing, Software and Process


When we filmed, we used Mihaella's video recorder. The original plan was that we transferred the clips onto both mine and Mihaella's laptops. However to transfer video from her video recorder to a laptop she needed a lead which she left at home. We agreed that Mihaella would be in charge of editing the video and she used windows live movie maker to do this. She put each clip into order using the story board to help her and once this was done added a title at the start. However, when we got the video back from Michaelle, there were a few mistakes. Firstly the clip at the start (where Lottie is filmed sitting on her phone texting) went on for far to long, longer then we had agreed. Secondly, the shot where I walk in the room was repeated twice, one straight after the other. The editing was handed over to Kirsty who was able to finish editing the video and take out any unwanted footage. I was a small part of this process but after some failed attempts at editing it from me, Kirsty was able to get it done quickly and efficiently. with good results.    


Film log - When filming

Filming went well and luckily we did not have to many complications and managed to get the filming done in the hour we had available to us. 

We did redo a few shots several time but that was because we were not happy with how they were done or we missed out a line. Luckily it did not waste time redoing them. 

We were very aware when it came to continuity and made sure not to make any mistakes. Every time Michaella moved the camera to change who she was filming (being careful not to cross the 180 degree line) we stayed still so when she begun filming the other person we could carry on with our movement. 

We had not practice what we were going to say each time so every line we had to say, Kirsty told us what it was. I don't think it was a problem we did not remember what we were going to say as we wanted to get into the filming and having Kirsty there to help us made it easier and filming, i think, was much more efficient.

We changed a few bits to the storyboard as in one clip, Lotti pushes the chair over and then picks it up when she goes to sit back down. However, when we came to film this part we realized  that, because of the shape of the chair and the height of the table, it worked and looked better if she just pushed the chair behind her as she stood up then pulled the chair closer when she went to sit back down again. 

All these are only minor issues that happened in filming but did not effect time or our video in any way.  
We made the time we have available and spent most of it filming. The only time we were not filming was when we went to find the class room, when we were getting ready to film and the small gaps between filming each clip. I think we used our time efficiently   

Film log - Getting the filming done

We chose to get all our filming done in one hour long lesson. There were several reasons for this:

  • Continuity purposes
  • Time
  • Area of filming
  • Sickness
We thought, for continuity reasons, getting all the filming done in one go was important. We did not want to have to worry about what we were wearing or how we had our hair and try to replicate that on another day. Also, if we moved from the table where we were sat during filming, it may be harder to sit back in that exact position if we left and came back to it. A different sitting position is something else that would be noticed as a continuity error, something we did not want in our video.   

Time was another reason we pushed to get the filming done in the hour we had available. We wanted to make the most of that hour. We wanted to make sure we had plenty of time to get the editing and filming done before our deadline. We really wanted to make good use of the time we had available.  

Also, area of filming was important we did not know when the room would next be free and we did not want to start filming and come back the next day to find there was a lesson in the room. This would waste time waiting for a day when it was free or mean we would have to move onto a different room completely and start filming again. This was not an option.   

Lastly, we were worried about sickness. On this day everyone in our group was present and we wanted to get the filming done while we were all together. If we put of filming for another lesson, not only would this waste time but also if one of us was absent there could be complications. If Kirsty or Michaella were ill there would not be problem as they could take over each others roles. However, as we appear in the video, if Lotti or I was absent we would have to wait in till we were both in again once again wasting time and meaning we may not of reached our deadline. 

All these are important reasons to why we pushed our selves to get all our filming done in one hour.  

Tuesday, 15 January 2013

Actors, Props and Costuming

Actors
We organised this at the very start planning. I worked in a group with Lotti, Kirsty and Michaella. However, in first lesson of planning, both Michaella and Kirsty were absent. For planning purposes, Lotti and i wanted a ruff idea of who would being what so we chose our roles within the group and gave Kirsty and Michaella other roles. The original plan was to have Kirsty and I to two people would be filmed and Lotti would be in charge of continuity with having the storyboard and dialogue to make sure it is followed during filming. Michaella had the role of filming. Michaella and I kept these roles however, when the dialogue changed, Lotti and Kirsty switched roles. Kirsty said she felt happier being in charge of continuity rather then being filmed.   


Props and Costume
We only had one prop and that was Lotti's phone which she only used at the very start of the video before I enter the room. She used it to make it look like she was texting someone. We did not feel the need for anymore props as we did not need any for the nature of the conversation and because they were simply not needed. 

We also did not feel the need for costumes. We simply filmed in what we wore that day. 

Because we has only one prop and no costumes no organisation or planning was needed. 


Location


The first day when we planned to film, we struggled to find anywhere to film. We had planned to film in a classroom. However, when it came to filming, we looked around the classrooms and they were either  in use for lessons or unavailable for other reasons. We became aware of how un prepared we were and wanted to be more prepared for our next available lesson. We went to the office and got a list of class rooms that would be free the next day when our media lesson was, this was when we planned to get our filming done. Luckily, we got given a list of at least 6 available classrooms we could use to film in. Knowing we have this list made us much more prepared for the next day. 
When it came to filming the next day, there was another group that came in after we shot one of our clips. They had started filming in there the previous day and obviously had to continue their filming in there. We moved on to another room on our list. In the end we ended up filming in S6, a science room in the school.

This diagram below shows the layout of the class room and where about in that classroom our filming was focused.     


The photo below shows S6, the class room we filmed in. This is the view looking in from the door. 


The photo below is the table Lotti and I sat at when we were filming . Lotti the side of the wall and I sat facing her.


This photo below was taken on the 180 degree line. This was the angle that would be looking at me.


The next two photos below was taken the other side of the 180 degree line. This is the side that no filming took place. If we were to film this side as ell as the other side, we would not be following the 180 degree rule.


Monday, 14 January 2013

Dialogue

This is the dialogue we wrote up and used in our video. 


­Dialogue
Person A – Hi (3a)
Person B – oh my god you will never guess who I saw?! (3b)
Person A – Niall Horan?! Jedward?! David Tennant?! Danny O’Donoghue?! Ian Somerhaulder?! Ashley Horne?! AMELIA BARNARD?! (4)
Person B -…….No! McFly (5)
Person A – OH MY GOD DO THEY WANT TO MARRY ME?! (4)
Person B – No but they gave me free tickets! (5)
Person A – YOU WHAT?!? (Makes very long rant) (4)
(Chair over) (6)
Person B – but wait you are coming with me?
Person A – OH MY GOD I LOVE YOU SO MUCH OH MY GOD (6b)
(sits back down) (6c)
Person A – so where is it? When is it? (7)
Person B – in the arena in about 20 minutes (8)  
Person A – oh my god what are we doing here lets go already! (9a)
(Gets up)
  Person A – *singing McFly*  (9b)
(both leave) (10)

How we will use each rule in our video

Shot reverse shot


•How will we use it?- we will use this  throughout the clip. We will use this to show the conversation in the film by filming one person talking and then changing it to film the next person as they respond.  


180 ruleHow will we use it?- When we film, we will make sure we use this rule and always film on the same side as the two people having the conversation in our piece.

Match on action

•How will we use it?- When we have a wide shot and a close up of the same movement, we will make sure that when we edit it, it runs smoothly and the movement is not repeated in two different shots. 


Storyboard

This is the storyboard we put together and used for our planning.


Idea over view

When we first started planning for our video, we had to think about what we wanted the conversation to be about. We started with three main ideas.
 
  • A meal conversation - What to have for dinner
  • Organisation of a party
  • Excitement over a band
We chose not to do the meal conversation. We had written the dialogue for this but we decided to bin it and start with a new idea. We did this because we though the dialogue was too dull and boring and also, there was not much to discuss mean that the clip would be very short. We wanted something that could go on for a fair amount of time and be more interesting.
 
We did not go with the party planning idea as we thought that there would have to be a lot of dialogue for it to be a decent conversation and make sense. with a lot of dialogue the piece would have to be very long and we were concerned about getting it all filmed and edited in the time we had available.
 
We chose the idea of band excitement as this could be short, interesting and it was a clip that would make sense even with a small amount of dialogue.


Sunday, 13 January 2013

Shot reverse shot


The purpose for the shot reverse shot is to show two people in conversation and make the it look like they are looking at each other.The shot reverse shot often incorporates the 180 degree rule and the over the shoulder shot. This helps to show they are together in the same place at the same time. The camera will often be on Person A while he or she is talking and then switch to filming person B when he or she replies to person A.  However, it may also put the camera on parson B while person A is still talking to show person B's reactions and facial expressions to what is being said. 
If the people are filmed talking head on and then its all edited together, it does not look realistic and it may look like one person was not even in the room when the other was being filmed. However, the over the shoulder shot does not always have to be used, as long as the 180 degree rule is used and the person is filmed at an angle, the shot reverse shot can be used.  If person A is seen to be looking off screen and so is person B, it can look like they are in conversation to each other.

This diagram show how the people may bee seen on screen when using a shot reverse shot. The camera is not filming them face on.


This diagram shows the over the shoulder shot.


Here, i have taken screen shots from a short scene of Midsummer Murders. 


These two shots appear one after the other, the two people are in conversation and in the same room at the same time. This is shown using two over the shoulder shots. When it switches from on to the other, this is an example of shot reverse shot. 


These are the next two shots of the two charterers. Over the shoulder shots are not used but the 180 degree rule has been used (as in the shots before) and the angle of the camera added to the fact that both charterers are looking off screen helps to make it look like they are looking at each other. Once again the shot reverse shot is demonstrated here. 

Match on action

Match on action is important and mistakes can usually be made during editing. If the same movement, such as someone opening a door, is filmed as a wide shot and then a close up of the hand, when the the two clips are edited together, the movement must match. If the wide shot shows the door being opened about 4cm and then it changes to the close up and the door is shut and there is the repeated movement of the door opening that 4 cm again, the viewer will pick up on it. It may add confusion but it will also look like a poor edit and the effect would be lost. This is why match on action in import. It is also the same with someone walking. If on a wide someone walks completely past the window and the camera changes to film from behind them, they must still of past that window, even if they are a few steps from completely passing it, the mistake will be noticed. When editing we must make sure that all our movement matches.    

Here, i have taken photos to demonstrate match on action. 


In the top photo i am demonstrating a medium close up of someone opening the door, the door handle is bent and the hand is loosely over it, if we then look at the second photo, the close up, the positioning of the door handle and the hand is the same. If this was in a clip, the movement would flow effortlessly with no problem and the shot would look realistic and it would be a successful edit.  


If this shot of someone reaching for the handle appeared after the one of the door handle being pushed down, then it would not be a clean edit ad it would look unnatural to the viewer. 

The Rules

The Definition of the three rules


Match on match actionA cut made on action or movement between two shots in which the action has been overlapped either by repetition of the action or by the use of more than one camera.


Shot reverse shot -  A film technique where one character is shown looking (often off-screen) at another character, and then the other character is shown looking "back" at the first character. Since the characters are shown facing in opposite directions, the viewer unconsciously assumes that they are looking at each other.

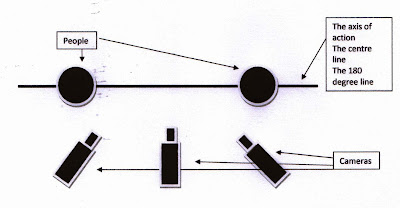
The 180 degree rule  - Two characters in a shot should always be filmed from one side, there is an imaginary line used that must not be crossed as this may create confusion for the viewer. The two people in the shot must have the same left/right relationship to each other.  

Introduction and Brief

The task we were set is called the Preliminary task. I worked in a group of 4, Kristy White, Lotti Bowden, Michaella Reddrop and my self. 

The task we were set was to create a short clip of someone walking in to a room, sitting at a table (where someone else was already sat) and then exchanging a few lines of dialogue. When creating this short clip we had to include:
  • Match on match action
  • Shot reverse shot
  • 180 degree rule

The 180 degree rule


· Figures are balanced
· Figures are symmetrically positioned
· Lighting remains constant
· Action remains mainly in the center of the frame.


The 180 degree rule
Camera position is important so it clearly shows where people are in relation to other people in a room. If it was no right, it may distort how the shape and size of the room is seen. It ensures that relative positions in the frame remain constant.
It is often used in conversations or when two people are looking/talking to each other. By keeping the cameras all on one side of these people, its easy to understand where these people are in relation to each other. On top of this, the backgrounds seen always remain constant because the camera always points at the same area each time.